
The Dilemma- Finding Holiday Gift Wrap During the Summer
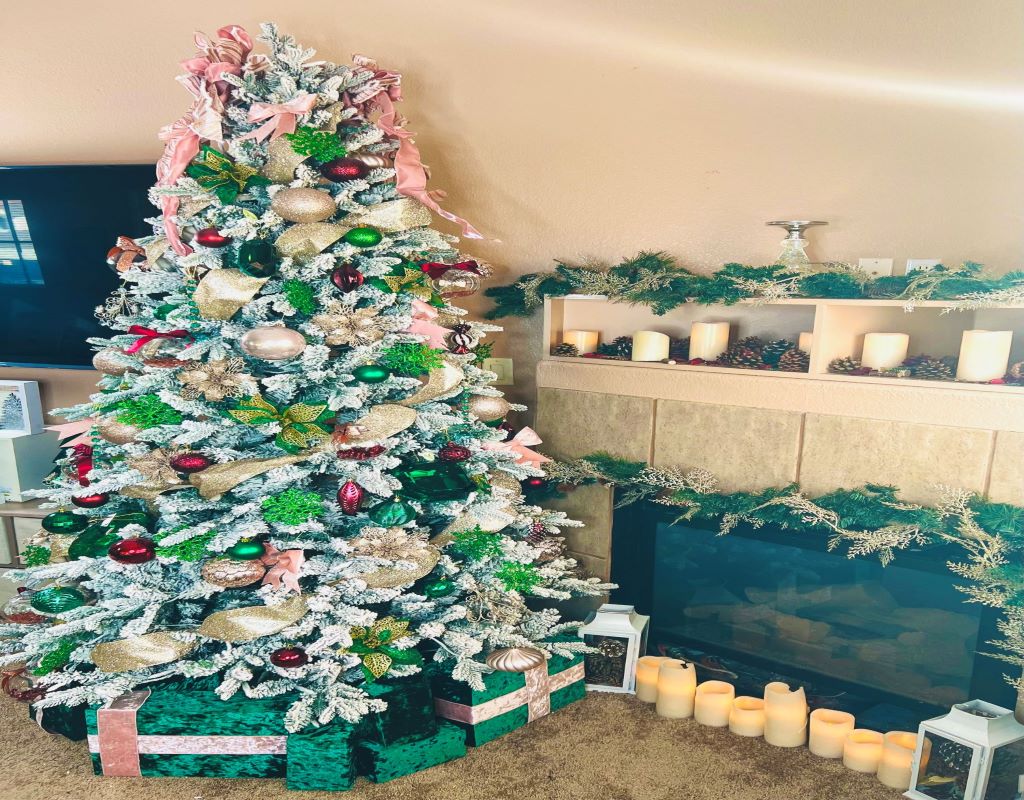
Hey, y’all! Let me set the scene: It was early August and I needed to get my apartment ready for Christmas. Yes, it was still summer, and yet I am putting up my Christmas tree (it’s a holiday tree when it’s not Christmas time). When you run a Christmas-based business like mine, you need to start taking product photos and creating some content early. It has its advantages too, the summer has more natural sunlight for better-looking photos and videos.
I’m going to all of the craft stores looking for wrapping paper for fake presents to go underneath my tree. I had a set of 3 storage boxes in various sizes. These will make the perfect shape for presents! Next was buying gift wrapping in my business colors. I went to probably 5 stores AND looked on Amazon but found barely any wrapping paper in general. So now I had to decide what to do… As I was in the craft store, I saw that all their ribbon and fabric were on sale. That’s when it hit me, “Why not buy a couple of yards of fabric that will match the color scheme of my tree?” This could work. It is an eco-friendly approach. My tree will be up for many months, and I need something that will last a while.
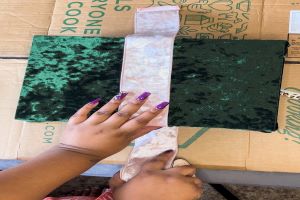
I searched the fabric section and came across this beautiful emerald-green crushed velvet fabric. Now I had to figure out how to attach the fabric to the box. Packing Tape? No. The tape would not stick to the fabric due to the fibers. Fabric glue? I wasn’t a fan of fabric glue because of the residue it might leave on the fabric. I decided to use a staple gun for multiple reasons. Upholstered furniture like dining room chairs are stapled to the seat frame or padding. Staple guns are easy to use and remove. So, if I messed up, all I have to do is take the staple out. No large holes will be left in the fabric once it is removed. I started to see how this could work and bought some materials. Let me show you how this project turned out.
Materials:
- 2-4 yards of fabric (the more stretch the fabric has, the better)
- Staple gun and staples
- Large surface to cut on (I used a large cardboard box)
- Cardboard boxes of various shapes and sizes taped shut
- Sharp scissors or rotary cutter (I’m obsessed with rotary cutters! Makes cutting circles and straight lines easy)
- Optional: ribbon, bow and paperweight
It’s time to create

Step 1:
Lay your fabric pretty side down onto your cutting surface. Make sure the fabric is flat and smooth. Place your box on top of the fabric. I recommend placing the box close to parts that already have a cut line or end. That way you don’t have a bunch of fabric scraps at the end.

Step 2:
Work on one side of the box at a time. I started with a longer side first, (once it was completed, I then worked in a clockwise pattern to cover the covered the other sides). Take your fabric with the cut line or end and cover about 1” from the top of box. I eyeballed this; it doesn’t have to be exact. You want the fabric to look smooth and tight on the longer side. Just like a present.
*Since these aren’t actual presents, there is no need to wrap the entire box! (Just keep the unwrapped section on the floor or facing away).*

Step 3:
Place one hand or paper weight on one side of the box fabric. This will make the fabric stay in place as you staple. Grab your staple gun and staple the fabric to the box. Don’t worry about the corners, we will do those in the next few steps. Use multiple staples to secure the fabric to box. Make sure to watch out for your fingers!

Step 4:
Once the side has been stapled, rotate your box clockwise. The excess fabric should be away from you. The next side of your box, that will be stapled, should be closest to you. Start at the corner of the box that is perpendicular to the side you just stapled. Fold in the fabric to create a triangle, to cover the corner. Bring that triangle out, away from the box. With the triangle piece out and away, start to staple the side until you get to the opposite corner. Use your hand or paper weight to keep the fabric in place.

Step 5:
Take the excess triangle piece and pull it over. The corner should be covered now. Staple the corner piece to the top of the box.

Step 6:
Turn the box clockwise. The depth of your box will determine how much fabric you need to cover side 3. Take the fabric and pull it up and towards the stapled side of the box. Just like the first side, you want approximately 1” of the box from the top to be covered. Once you have about a 1” covered on the stapled part of the box, cut the fabric.

Step 7:
Repeat step 6 for the last side of the box. You should have 2 finished and 2 unfinished sides now.

Step 8:
Turn the 3rd side to face you. Fold the corner and mimic the process from Step 4 and Step 5. Staple the rest of side 3 to the box. Repeat this step for the last side.

Step 9:
Yay you are almost done! I go back to my staple gun and add more staples to secure the box. If your corners aren’t as tight as you would like, remove the staple and cut off a little until you are satisfied.
BONUS STEP:
To add even more glam to your boxes, add ribbon or bows. This will make your “presents” look more luxurious! Bind it to your box using a staple gun or whatever you want to use.
The results are in…

The box(es) should look like this. These are so beautiful! Get creative and use different textures and colors. The best part about this project is that they can be used over and over again! No need to wrap boxes year after year. This saves you time, money, and is more eco-friendly than using wrapping paper. Are you short on storage? Do you have a new theme for the holidays? Remove the staples, break down the boxes and fold the fabric. Put it away for next year.
Pro tip: Measure the boxes and label the fabric with the box measurements. That way if you lose your old box, you know what sized box you need for next time.
How did your presents turn out? Share this with friends and family and use #hautemelanincrafts Don’t forget to tag us on social media @hautemealaninculture! We’d love to see everyone’s spin on this idea. Want to learn more about Haute Melanin Culture? Read our About us page and get to know the owner, Zahria!

View comments
+ Leave a comment